
Chicken breast is lean, and that makes it harder to cook well than dark meat. This post is for cooking a big batch of it on a charcoal grill for meal prep, the kind you slice up and eat all week. A charcoal grill gives you a lot of cooking area, so a big batch is easy, and you get a smoky flavor an oven can’t give you. Further down, we’ll also show you how we reheat it without turning it into cardboard. It makes a quick protein for weekday lunches and dinners.
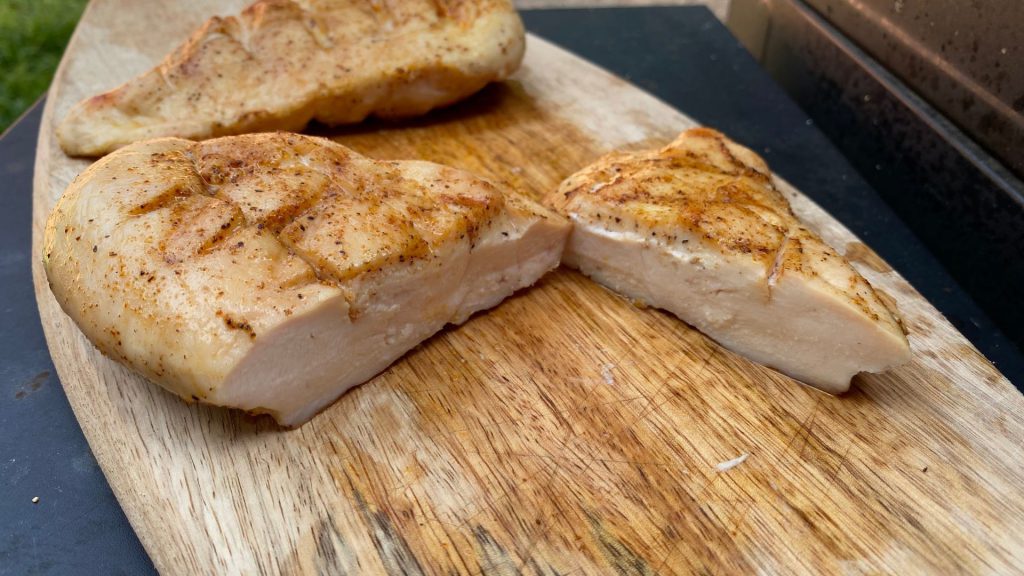
Before we batch cooked anything, we ran a few tests to figure out the best way to cook chicken breast. Here’s what we learned. If you only want the recipe, jump to the recipe card at the bottom.
Test 1: the internal temperature
If you want to avoid dry, stringy chicken, temperature is where it starts.
We cooked to the USDA’s standard 165°F first. It came out tender and a little stringy, but still fine. The same day, we cooked one unseasoned piece for our dogs and pulled it at 150°F. That piece turned out to be some of the juiciest chicken breast I’ve ever made. No pink, definitely cooked. So we went and looked into why.
The 165°F number is an “instant” kill temperature. Hit it for even a second and the bacteria that matter, like Salmonella, are gone. But that isn’t the only way to get there. The USDA’s time-and-temperature pasteurization tables show that holding chicken around 150°F for roughly four to five minutes gets you the same bacterial kill as an instant hit of 165°F. Carryover heat helps too. The internal temperature usually climbs a couple of degrees while the chicken rests, and the resting time alone covers most of that window.
Links: https://blog.thermoworks.com/chicken-internal-temps-everything-you-need-to-know/
For this recipe, we aim for about 150°F, plus resting. If you’d rather stay on the safer side, cook to 165°F. It will be a little less juicy, but it still works.
Test 2: pounding to an even thickness
We pounded one breast with a cast iron pan and left another as is. Same rub, same heat. We pulled both at the same temperature, rested them for 10 minutes, and I blind tested them. The unpounded breast kept its dome shape and came out drier. The pounded one was noticeably juicier. It’s an extra step, but it’s worth it, because the whole piece cooks evenly.
Test 3: dry brine or wet brine
To keep the results consistent, we used only salt for this test: a 5% salt wet brine against a dry brine of plain salt, both left in the fridge for 2 hours.
Both tasted surprisingly good. Even with nothing but salt, the chicken had great flavor from the charcoal. We didn’t find much difference in tenderness, but we liked the dry brine better overall. It gave a better crust, and it’s less work. You don’t have to measure a salt-to-water ratio. Just eyeball it, sprinkle kosher salt over the chicken, and pat it dry before it goes on the grill.
Test 4: scoring the chicken
Once we settled on dry brine, we ran into another problem. We cooked the chicken to 120°F, then brushed both sides with melted garlic butter until it reached about 150°F. The inside was still juicy, but the dry brine had already built a crust, and the butter flavor couldn’t get through it.
So we started lightly scoring the breasts with shallow diagonal cuts, not all the way through. The cuts catch the seasoning when you baste with garlic butter, and the extra surface area picks up more smoke.
Test 5: direct heat or indirect heat
We tested both, and each has advantages.
If you want the juiciest chicken, or you’re cooking a lot of breasts at once, start over indirect heat and move the chicken to direct heat at around 130°F for a quick sear.
If you want a heavier crust, you can cook over direct heat the whole time. A rub with a lot of sugar (brown sugar as the first ingredient) added near the end helps build that crust. We still prefer starting on indirect heat. With direct heat only, a large batch is hard to manage, and you need a lot more charcoal to spread out more than 4 breasts. The chicken also wasn’t as juicy as we expected, because it’s hard to keep a thermometer in while you’re constantly flipping.
How we cook it
Pat the chicken dry, pound it to an even thickness, and lightly score the surface. Season with your dry rub and leave it uncovered in the fridge for anywhere from 30 minutes to 4 hours.
Meanwhile, set up the charcoal for two zones and aim for a grill temperature around 300°F. For extra smoke, you can add a few wood chips. We use a smoker box so they don’t burn up too fast.
Pat the outside dry again, spray with avocado oil, and set the chicken over the indirect zone with a thermometer in. Melt a tablespoon of butter in a cast iron pan on the indirect side, with extra garlic and a little of the rub. When the chicken hits 130°F, move it to the direct side to sear and baste it with the butter until it reaches about 150°F. You can do this in batches. The chicken on the indirect side keeps cooking slowly while the first batch sears.
Meal prep and reheating
After dinner, slice the leftover chicken thin and lay it on a plate. Plates stack, so you can freeze several without crowding the freezer, and yes, we freeze everything.
Here are the two ways we like to reheat it.
With pasta: this only works if your plate is about the same size as your pasta pot. Cook the pasta until it’s about 5 minutes from your preferred doneness, then set the frozen plate of chicken on top of the pot for about 5 minutes. The steam warms the chicken gently and keeps it moist. Then slide the chicken into the hot pasta water and stir so every piece heats through. Drain, toss with your sauce, and you have a protein-packed pasta dinner.
With a freezer meal: heat the freezer meal according to the package, stirring now and then so it heats evenly. When it’s about 1 minute from done, set the frozen chicken plate over the bowl and heat them together. Add 30 seconds if needed.
That’s how we cook and meal prep chicken breast. It’s a quick process, and it gives us a week of protein without much effort. Let us know how your chicken turns out!